Support
Contact Us
Technical Support
Tech Support Hours
Mon-Fri
8:30-5:00 Central Time (USA)
Call Tech Support
Email Tech Support
Before contacting Digital Acoustics Technical Support, please review our Getting Started and Troubleshooting Steps pages. These procedures address the most common issues encountered by our customers. Our technical support team is available Monday through Friday during normal business hours by filling out the form on the Contact Support page.
No returns accepted without pre-authorized RMA number from Digital Acoustics Support.
For questions about orders including shipping information, please email us at ordersupport@digitalacoustics.com
Frequently Asked Questions
Software
What is the default UserID and Password for TalkMaster FOCUS Admin Console
The default UserID and Password for the TalkMaster Admin Console is:
- UserID: admin
- Password: admin
I am unable to login to the Admin Console
The default Logon ID is: admin, the default Password is: admin
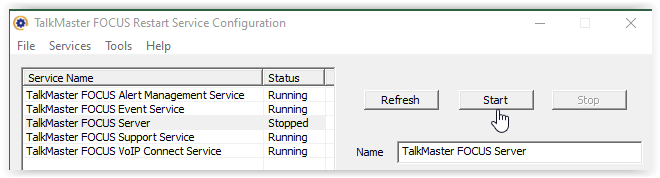
If the Logon dialog counts down from 10 and then retries, the TalkMaster FOCUS Serve is not running. Look in the lower right-hand corner of the screen in the Windows System Tray for the iEnterprise Service status. Red indicates that the service in not running. Right click on the ICON and select FOCUS Services Status.
In the TalkMaster FOCUS Restart Service Configuration dialog, click on the TalkMaster FOCUS Server and then press the Start button. You should be able to Login now.
Can I set the volume of the IP7 Endpoints from software?
The volume level of IP7s can be found and set from the Operator Console.
When the volume levels have been set, go back into the Preferences and uncheck the Setup Volume box
- Logon to the Operator Console using the Admin UserID
- Select menu option View –> Preferences and then click on the Audio and Volume tab
- Check the Setup Volume box and then press OK
- From the main screen, click on an IP7 and then press the Get Volume button
- The current volume level (from 1 – 7) will be displayed
- Select the new volume level from the drop down and press the Set Volume button
I am on an old version of TalkMaster. How much does it cost to upgrade to the latest version?
If you are running TalkMaster LE or an old version of TalkMaster SOLO, you can upgrade for no charge. Just visit the Software/Firmware Downloads page, download the new version and follow the instructions in the Release Notes. If you are running an old version of TalkMaster EE, you can upgrade to TalkMaster FOCUS with the same features for no charge. A License fee will apply if you want to utilize any of the new features that you had not previously purchased.
Is there a way to increase the volume from the microphone in the Operator Console to the Intercom?
First check to see if the IP7 Endpoints volume level is set to level 6 or 7. If audio is played from pre-recorded .wav files in the Operator Console (i.e. the CHIME button) is loud, but the the volume from the Microphone in TalkMaster is too low, verify that Microphone Boost is enabled on your audio card:
- Test the microphone using the Operator Console to verify the sound level at the endpoint
- Open the Windows Control Panel
- Double-click on the Sound ICON
- Select the Recording tab
- Click on the selected Microphone and select the Properties button
- Select the Levels tab
- Move the slider to the right and press Apply
How do I save my configuration data when I upgrade to a new version?
To backup the TalkMaster configuration data, please review the Backing up TalkMaster Server Files and Settings Application Note. In most cases, the configuration information is automatically converted to the new release during an upgrade unless noted in the associated Release Notes.
How do I configure IP Endpoints that are in a different network subnet?
TalkMaster will discover IP7 Endpoints in different network subnets if your network has IGMP Multicast enabled between the subnets. If it does not, you can either move the IP7 Endpoint into the same subnet as the TalkMaster FOCUS Server or you can install TalkMaster SOLO on a computer in the subnet the IP Endpoint is connected to. Once the IP Endpoint has been properly configured, it will be able to connect to the TalkMaster FOCUS in a different subnet.
I can’t find the IP Endpoints after pressing the FIND ALL button from the Admin Console –> IP Endpoints tab
When the FIND ALL button is pressed, TalkMaster FOCUS Service sends out UDP discovery packets. The IP Endpoints respond to the discovery packets on UDP Port 5001. The main reason that IP Endpoints are unable to be discovered is port blocking software or a firewall that blocks incoming UDP port 5001. Temporarily disabling this software usually resolves the issue.
If you are still unable to discover the IP Endpoints:
- Reset the IP Endpoint to factory default by powering off the device
- Hold down the Vol+ and Vol- buttons
- Repower the device (do not release the Vol+ and Vol- buttons)
- Wait 10 seconds before releasing the Vol+ and Vol- buttons
- In the Admin Console, select menu option File –> Restart Service and then try the FIND ALL button again
If the IP Endpoint and the TalkMaster FOCUS Server are in different network subnets:
- Make sure that Multicast (IGMP Protocol) traffic can flow between the subnets. The discovery packet is sent out on Digital Acoustics registered Multicast Address of 224.0.23.59 and the device will respond to the IP Address that the request was sent from
- In the Admin Console, select menu option File –> Restart Service and then try the FIND ALL button again
If Multicast is not available:
- Temporarily install TalkMaster FOCUS Server and the IP Endpoint in the same network subnet
- In the Admin Console, select menu option File –> Restart Service and then try the FIND ALL button again
Another option is to connect the IP Endpoint directly to a PC running TalkMaster FOCUS Server:
- Use an Ethernet cable to connect the IP Endpoint’s primary Ethernet port directly to the PC’s Ethernet Port
- Assign a fixed IP Address to the PC
- In the Admin Console, select menu option File –> Restart Service and then try the FIND ALL button again
What’s the difference between TalkMaster SOLO and TalkMaster FOCUS?
TalkMaster SOLO is free with the purchase of any Digital Acoustics hardware and allows a single Operator to logon and either administer or communicate with IP Endpoints. It consists of the TalkMaster Server, the Admin Console and the Operator Console. TalkMaster FOCUS is the same base software as TalkMaster SOLO, but requires a license fee to to use the following features:
- Multiple Logons for the Operator Console
- Associate and Monitor Video Cameras with IP Endpoints in the Operator Console
- VoIP Connect to assign extensions to one or a group of IP Endpoints in order to communicate with a SIP based phone system
- Automation to create automatic audio responses based on IP Endpoint actions and to monitor CAP/Atom or RSS feeds, convert the text to audio and send it to selected IP Endpoints
Please contact us for pricing information on TalkMaster FOCUS.
Visit our Software/Firmware Downloads page to download SOLO or FOCUS.
Hardware
How do I mount the IP7 on a wall?
Using the plastic mounting plate that is included with each IP Endpoint:
- Bend the plastic plate at the seam and snap into two pieces
- Align the two pieces with the screw holes on the bottom of the IP Endpoint
- Use the provided screws to fasten the plates to the bottom of the IP Endpoint
- Mount the IP Endpoint to the wall with the green connectors pointing upwards
Is there a way to increase the speaker volume at the Intercom station?
Make sure the IP7 volume is turned up (see Software – Can I set the volume of the IP7 Endpoints from software?). If the volume at the IP Endpoint is OK when the CHIME button is used in the Operator Console but the the volume from the Microphone is too low, increase the Microphone gain on your PC’s audio card:
- Open the Windows Control Panel
- Double-click on the Sound ICON
- Select the Recording tab
- Click on the selected Microphone and select the Properties button
- Select the Levels tab
- Move the slider to the right and press Apply
- Test the microphone using the Operator Console to verify the sound level at the IP Endpoint
What is the warranty on IP7 Hardware?
IP7 IP Endpoints are warranted against defects in materials and workmanship for a period of TWO (2) YEARS from the date of original retail purchase. Warranty is void if the IP7 Endpoints are installed incorrectly or if damaged by an Act of God.
How do I hook up a speaker or call station to an IP Endpoint?
Refer to the Getting Started Guides on the Documentation and Manuals page for the particular IP Endpoint you are connecting. Hardware Reference manuals for IP Endpoints are also available on the same page
Compatability
Is TalkMaster FOCUS Compatible with Windows 11 and Windows Server 2022?
TalkMaster FOCUS is compatible with Windows 11. Please be sure Windows 11 is updated and current.
TalkMaster FOCUS is compatible with Windows Server 2022. You must install Desktop Experience.
Please visit the Software/Firmware Downloads page under the Support menu to download the latest version of TalkMaster.
Please contact Digital Acoustics Support with any questions or concerns.
Trouble Shooting Steps
Troubleshooting Introduction
Digital Acoustics TalkMaster Software and IP7 Audio Endpoints are very reliable and once configured, typically run untouched for years. Most issues can be avoided by following the Getting Started Guides for the IP7 Hardware and TalkMaster Software.
Review the Getting Started Guides to setup the IP7 hardware connections.
Review the Getting Started Guide included with the TalkMaster FOCUS Installer to alleviate most software and configuration issues.
How to Troubleshoot
Before contacting Digital Acoustics Technical Support, please run through these basic troubleshooting steps:
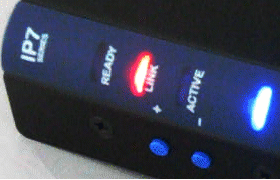
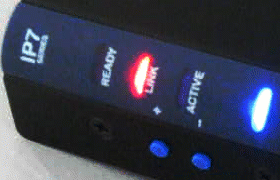
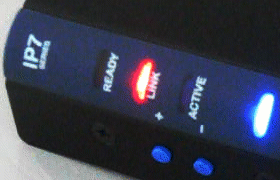
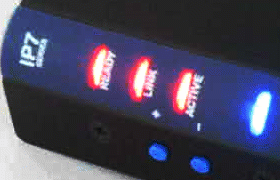
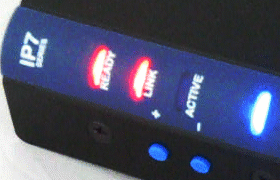
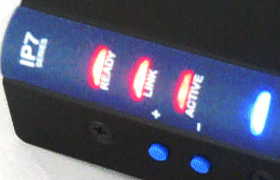
1. IP7 LEDs
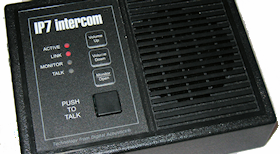
When troubleshooting Digital Acoustics IP7 Endpoints and TalkMaster FOCUS Software, it is important to understand the different states represented by the IP7 LEDs. The four LEDs on the IP7-STx, IP7-SE8, IP7-FD, IP7-SS20 and IP7-SS40 all have the same states.
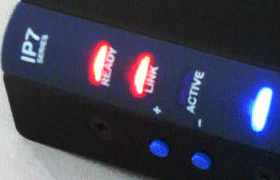
The LEDs on the IP7-EDx/ESX models are similar, but are labeled differently. In this troubleshooting step:
- Substitute the READY LED for the IP7-EDx/ESX’s ACTIVE LED
- Substitute the ACTIVE LED for the IP7-EDx/ESX’s TALK LED
- The MONITOR LED is only valid when the IP7 is in a connected state and tracks the activity of the Monitor/Open button
Also, the Primary RJ-45 connector on all IP7s have a green and amber LED which follow the LINK and READY LEDs respectively.
Please review the LED states before proceeding to the next step:
Blue power LED must be on solid
- If using the IP7 J1 or Aux Power connector, make sure the correct voltage (labeled on the J1 connector) is applied
- To prevent damage to the IP7, do not connect power to both the J1 and Aux Power connectors
- Verify the input voltage using a multi meter
- If using PoE (Power over Ethernet – 802.3af compliant) make sure the IP Endpoint supports the PoE feature (the SS20/SS40 models do not support PoE)
- Make sure the PoE cable is plugged into the IP7 Network Port labeled Ethernet 10/100, not Port 2 10/100
- If the IP7 still does not power up and is still covered by its two year warranty, contact Technical Support
Blue Power LED is the only LED that is on
- The Firmware has been corrupted, most likely due to a failed firmware update
- Download and install the Standalone Firmware installer and follow the instructions to flash the IP7 using a USB cable
LINK LED must be on solid
If the LINK LED is not on, check the following:
- Make sure the network cable is plugged into the IP7 network Port labeled Ethernet 10/100, not Port 2 10/100
- Connect the IP7 to another network cable and port on the network switch
- If the IP7’s LINK LED still does not turn on and is still covered by its two year warranty, contact Digital Acoustics Technical Support
READY LED states
On the IP7-EDx/ESx desktop and wall mount models, this is labeled as the Active LED.
- Blinking 4 times/second – The IP7 is trying to connect to TalkMaster FOCUS and/or to a SIP Server – Proceed to the next troubleshooting step
- Blinking 20 times/second – IP Endpoint has received and responded to a discovery packet from TalkMaster Admin Console (FIND ALL button) or has just connected to TalkMaster FOCUS Server. Wait 30 seconds and then check the state of the READY LED again and proceed to the next troubleshooting step
- Blinking 1 time every 2 seconds – The device has been configured to connect to both TalkMaster and SIP. The device has connected to TalkMaster FOCUS, but is unable to register with the SIP Server – proceed to the next troubleshooting step
- On solid – Connected to TalkMaster FOCUS and/or to a SIP Server. The IP7 is properly connected to the software
ACTIVE LED States (only valid when the READY LED is on solid)
The IP7 will only play audio when it is in a Connected state (READY and LINK both on solid).
On the IP7-EDx/ESx desktop and wall mount models, this is labeled as the TALK LED.
The ACTIVE LED indicates an audio operation is in progress:
- No Activity – the IP7 is connected, but not transmitting or playing audio
- On solid – the IP7’s speaker is playing audio (half duplex)
- Blinking 2x/second – the IP7’s microphone is transmitting audio (half duplex)
- Blinking 4x/second – the IP7’s microphone is transmitting audio and speaker is playing audio (full duplex)
2. Installing TalkMaster FOCUS
TalkMaster Software Installation and Updating
This troubleshooting step outlines the process for installing or updating TalkMaster FOCUS. Digital Acoustics recommends that you update to the latest version of TalkMaster FOCUS before contacting Technical Support. The TalkMaster FOCUS Installer menu installs the TalkMaster FOCUS Server/Admin Console as well as some supporting services. It also can install the Operator Console, the Firmware Management Console and the Archive Console.
TalkMaster FOCUS Sever and the TalkMaster Administration Console must be installed in order to discover and configure IP7 Endpoints on the network.
The Operator Console can be installed on the same PC as the TalkMaster FOCUS Server or on a different PC.
The Firmware Management Console is optional and can be installed on the same PC as the TalkMaster FOCUS Server or on a different PC.
The Archive Console is optional and is typically installed on a different PC than the TalkMaster FOCUS Server.
- Make sure you have Administrative rights to install software on your computer
- Download the TalkMaster FOCUS Installer from the downloads page and run it to open the TalkMaster FOCUS Installer Menu
- Select the Install TalkMaster Server/Admin Console button. The USB License Key driver, the Support Central Application and the Restart Service will also be installed
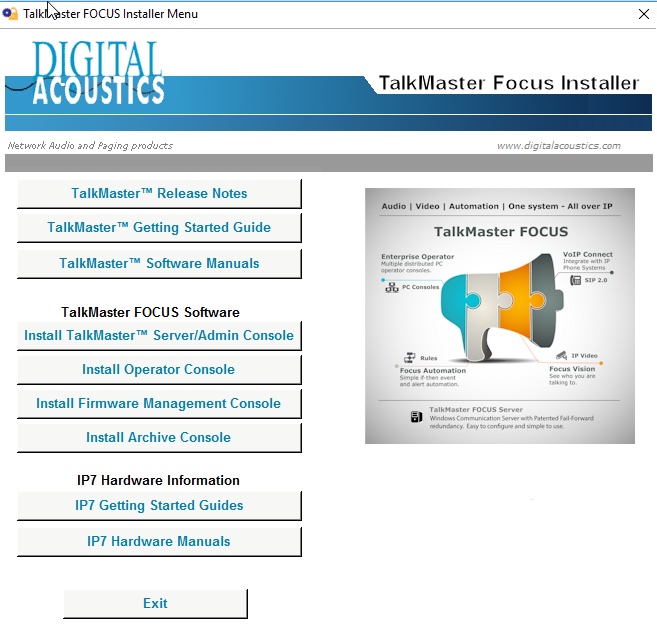
- During the installation, you may be asked to remove a prior version. Please answer YES. All of your current settings will be retained
- Accept the Software License Agreements and then select the default responses for all other questions during the install
- Digital Acoustics recommends that a copy of the Operator Console and Firmware Management Console be installed on the TalkMaster FOCUS Server for troubleshooting and maintenance purposes
- If the Installer menu instructs you to reboot at anytime during the installation, you must do so before proceeding to the next troubleshooting step
3. TalkMaster FOCUS Server
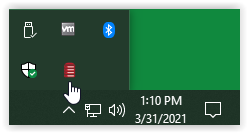
To verify that the TalkMaster Focus Server service is running, look in the Windows System Tray in the lower right-hand corner of the screen for the TalkMaster Status ICON (the ICON may be hidden, so you may have to click on the ∧ symbol to display the hidden Windows System Tray icons):
 Yellow (running – not licensed). The software will report as TalkMaster SOLO and will permit a single logon and up to 250 IP Endpoint connections. Proceed to the next step
 Green (running and licensed). Proceed to the next step
 Red (not running). The service can be started by right-clicking on the ICON, selecting FOCUS Services Status and then clicking the Start button for TalkMaster FOCUS Server. Make sure the TalkMaster Status ICON changes to Yellow or Green
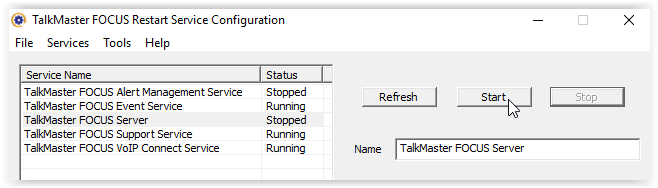
Please note that TalkMaster FOCUS Support Service and TalkMaster FOCUS Restart Service do not consume Console Licenses
If the ICON stays red:
If the TalkMaster Server will not start for any other reason, open the TalkMaster Support Central Application from the Windows Start menu, select menu option File >> Open Current Folder, double-click iEnterprise Support Database in the Folder window, and Email the Support file with the current date to esupport@digitalacoustics.com with a Subject Line of “Unable to Start TalkMaster”
Make sure the PC has a valid network connection. TalkMaster FOCUS Server will not start if a network connection is not available
Open the Windows Event Viewer and select Windows Logs >> Application, to check for failure messages from iEnterprise (TalkMaster Focus Server service). A Port conflict is the most common reason that TalkMaster Server fails to start. TalkMaster Server attempts to open Ports 5001 for UDP, 3000 for TCP and 3010 for TCP. Use the Windows command line netstat tool (netstat -a -b -n -p UDP) to determine if another application is using Port 5001 for UDP and try to change that application to use a different port. TalkMaster requires Port 5001 for UDP and will not start if it is not available. Contact Digital Acoustics Technical Support if you need to assign an alternate port for 3000 TCP and/or 3010 TCP to TalkMaster Server
4. TalkMaster Console Logon
TalkMaster FOCUS Administrator console
- Click the Windows Start button and start the TalkMaster FOCUS Administrator console
- Login to the TalkMaster FOCUS Administrator console using the default Logon ID of admin and a default Password of admin
- If the “Waiting for Login Retry” countdown message is displayed at the top of the Logon dialog, return to the previous troubleshooting step to verify that TalkMaster FOCUS Server is running
- Proceed to the next step when you have successfully logged on
All Other TalkMaster FOCUS consoles
- Since all other TalkMaster Consoles and Services do not have to be run on the same machine as the TalkMaster FOCUS Server, you must provide the IP Address or DNS of the TalkMaster Server when logging on
- Start the desired TalkMaster FOCUS console from the Windows Start button
- Enter a Logon ID and Password that were defined using the TalkMaster FOCUS Administrator console
- Specify the IP Address or DNS of the TalkMaster FOCUS Server with a port of 3010. You may have to press the Options button to display the Server IP Address information

- If the “Waiting for Login Retry” countdown message is displayed at the top of the Logon dialog, verify that the correct IP Address and Port for the TalkMaster FOCUS Server was entered on the Logon screen. If the “Waiting for Login Retry” countdown message is displayed again, return to the previous troubleshooting step to verify that TalkMaster FOCUS Server is running
- Proceed to the next step when you have successfully logged on
Out of Console Licenses
If the “Server is out of console licenses” message is displayed
If you are still unable to logon, return to previous troubleshooting step to restart TalkMaster FOCUS Server and then try to logon again
If the TalkMaster FOCUS Server System Tray ICON is yellow (previous troubleshooting step), only one console can be logged on to TalkMaster FOCUS. All TalkMaster consoles and services (including the Administrator console) that connect to TalkMaster consume a console license. Shut down any other TalkMaster FOCUS Console applications or services and then try to logon to the TalkMaster FOCUS Administrator.
5. IP7 Discovery and Configuration
Overview
IP7 Endpoints must be discovered and configured using the TalkMaster FOCUS Administrator Console. Each IP7 will require its own IP Address as well as the IP Address and Port that it must connect to.
IP7 Endpoints are shipped by default with DHCP enabled. If a DHCP Server is not available, you will need to obtain a valid static IP Address from your network administrator to assign to each IP7.
An IP7 Endpoint can be connected in several ways. This guide covers the following most popular connection methods:
- A Client that will connect to the IP Address/Port of the TalkMaster FOCUS Server
- A SIP Extension that will connect to a SIP Registrar/Server of a VoIP Phone system. The phone system administrator must provide the SIP Extension information
- A Hybrid client that connects both as a TalkMaster FOCUS Client and SIP Extension
For additional configuration options, please consult the TalkMaster FOCUS Administrator manual or select menu option Help >> Help on using Admin Console in the TalkMaster FOCUS Administrator console.
IP7 Discovery
After logging on to the TalkMaster FOCUS Administrator console:
- Select the IP Endpoints tab
- Press the FIND ALL button in the lower right hand corner of the screen
If no IP Endpoints are displayed on the left side of the page:
- First, make sure that your TalkMaster Server is running the latest version available from the Software/Firmware Downloads page . IP7 Endpoints now ship with version 7 firmware which cannot be discovered by a TalkMaster Server running a version prior to V5.2
- Restart TalkMaster FOCUS Server by selecting menu option File >> Restart Service, wait 30 second and then press the FIND ALL button again
When the FIND ALL button is pressed, the READY LED on the IP7 should flash rapidly (20 times per second) for 30 seconds. If it does not, the IP7s are not receiving the discovery packet:
- Make sure that the TalkMaster FOCUS Server is connected to the same VLAN as the IP Endpoints OR make sure that Multicast (IGMP) is configured between the VLANS
- If Multicast is not configured but the IP Endpoint’s IP address is known, select menu option Tools >> Find Device By IP Address (the device must be reachable via UDP). Use menu option Tools >> Save Device By IP Address to save the changes to the device
- If Multicast is not configured and the IP Address of the device is not known, then either connect the IP7 to the same VLAN as the TalkMaster FOCUS Server, or install the TalkMaster FOCUS Server and Admin Console on a PC in the same VLAN as the IP7. The IP7 can also be connected directly to the TalkMaster FOCUS Server PC’s network port via a standard network cable (once the IP7 has been directly connected to the PC, restart TalkMaster FOCUS Server by selecting menu option File >> Restart Service, wait 30 second and then try the FIND ALL button again)
- If the IP7 READY LED flashes rapidly, but does not show up on the left side of the screen, incoming traffic to TalkMaster FOCUS Server’s UDP Port 5001 may be blocked by a software based firewall, virus scanner or port blocker. Disable all firewall, virus scanners or port blocker software, restart TalkMaster FOCUS Server by selecting menu option File >> Restart Service, wait 30 second and then try the FIND ALL button again
Reset an IP7 to factory defaults
An invalid network configuration in the IP7 can prevent it from being discovered. Resetting the IP7’s configuration back to factory defaults will resolve this issue:
- Remove power from the IP7
- Hold down the two blue Vol+ and Vol- buttons
- Apply power to the IP7 and continue holding the buttons down until the unit reboots (about 7-10 seconds). If a speaker is attached to the IP7, a dual tone beep will be heard when the configuration is reset
- In the TalkMaster FOCUS Administrator console, press the FIND ALL button again
- If the IP7 still does not appear on the left side of the screen, contact Digital Acoustics Technical Support
IP7 Configuration
When the IP7 Endpoints appear in the left hand column of the screen, match the six-digit ICOM ID on the screen with the ID number printed on the back and on the front of the IP7 (next to the USB Connector) and make sure:
Verify that the IP7s READY and LINK LEDs are on solid
The TYPE field is set to either Client for TalkMaster Clients and for Hybrid configurations or set it to SIP Stand-alone for a SIP Extension
A valid IP Address is assigned to the IP7 using either DHCP or a static IP Address assigned by your network administrator
If the TYPE field is set to Client, the Server IP must be set to the IP Address of the TalkMaster FOCUS Server along with a Port of 3000
For SIP Stand-alone or Hybrid connections, select the eSIP tab and specify the IP Address or DNS of the Primary Registrar and Primary Server (typically the same) and a port of 5060. The SIP Extension and SIP Authentication (typically the same) as well as the SIP Password must be filled out using the information obtained from the phone system administrator. For Cisco or cloud based SIP Servers, please review the Application Note – eSIP Standalone Configuration found under the Support >> Application Notes page of our Website
Press the SAVE button
Repeat for each IP7s to be configured
Once the IP7 is configured, it can be placed on any VLAN or on any network that has routability to the TalkMaster FOCUS Server or SIP Server. IP7s with a TYPE of Client that are connected to that TalkMaster FOCUS Server can be configured with the TalkMaster Administration Console, even if they are in a different VLAN or Network
For IP7s with a TYPE of Client, open the TalkMaster FOCUS Administrator on the PC that is specified in the IP7’s Server IP field, select the STATUS tab and verify that the IP7’s connection status is listed as Connected
6. IP7 Connection Issues
New IP7 Endpoints are configured, but cannot connect to the TalkMaster FOCUS Server
Check the following:
- Verify that the TalkMaster FOCUS Server service is running by referring to Troubleshooting – TalkMaster FOCUS Server
- Verify that the IP7’s Server IP address is set correctly and that the Port is set to 3000. Refer to Troubleshooting – IP7 Discovery and Configuration
- If the IP7 has Firmware V7 or greater, verify that you are running the latest version of TalkMaster FOCUS. Refer to Troubleshooting – Installing TalkMaster FOCUS
- Verify that you can ping the IP Address of the TalkMaster FOCUS Server from a PC on the network where the IP7 is connected
- Verify that you can ping the IP Address of the IP7 from the TalkMaster FOCUS Server (this may not be possible if there is a firewall between the IP7 and the TalkMaster FOCUS Server)
- Verify that incoming TCP port 3000 is open or has been forwarded to the TalkMaster FOCUS Server. From a PC on the network the IP7 is connected to, open a CMD session and enter the command: telnet 111.111.111.111 3000 (where 111.111.111.111 is set to the IP Address of the TalkMaster FOCUS Server). If the “connection to host lost” message is displayed after 10 seconds, the port is open. If the “connect failed” message is displayed after about 10 seconds, the port is not open so you need to check your Firewall and/or make sure there is no port blocking software running on the TalkMaster FOCUS Server
The IP7 Endpoints are no longer connected to the TalkMaster FOCUS Server
- Verify that the TalkMaster FOCUS Server has a Static IP Address that has been provided by your network administrator and that its IP Address has not changed. If the TalkMaster FOCUS Server’s IP Address has changed, the Server IP field must be updated in the IP7s configuration. Refer to Troubleshooting – IP7 Discovery and Configuration
An IP7 Endpoint keeps connecting and disconnecting from the the TalkMaster FOCUS Server
- This is typically caused by a duplicate IP Address being assigned to the IP7 and another device. Disconnect the IP7 and use the Ping command to verify that another device is not using the same IP Address
- Poor network connections can also cause the IP7 to disconnect and reconnect. There must be a reliable network connection for the IP7 to operate correctly. Using the Ping command, verify that the time is less than 150ms
Once you have verified all of the above, check the Status tab in the TalkMaster FOCUS Administrator to make sure the IP7’s status shows as “Connected”: (note that if you are assigning the Server IP of a different TalkMaster FOCUS Server, the IP7 Status will always show as Disconnected. Always verify the IP7 Status on the TalkMaster FOCUS Server that the IP7 is connecting to).
7. IP7 Firmware Updating
IP7 Firmware Versions
All IP7s manufactured since 2011 can run Firmware Version 7 or later.
For IP7s manufactured prior to 2011, the latest IP7 Version is V6.3.4.23. The Firmware Management Console will not allow these IP7s to be upgraded with Version 7 or later.
If upgrading an IP7 from version 5 to either Version 6 or Version 7, you must upgrade to Version 5.3.5.4 first
Firmware for V5.3.5.4, V6.3.4.23 and the currently shipping version 7 are all included in the firmware download found on the Software/Firmware Downloads page.
IP7 Firmware Upgrading
IP7 Firmware updates are sent over the network. For best results, install the latest version of the TalkMaster FOCUS Server/Admin Console as well as the TalkMaster FOCUS Firmware Management Console from the Software/Firmware Downloads page.
- Using the TalkMaster FOCUS Administrator console, verify that all IP7s are connected to the TalkMaster FOCUS Server and that they each have a valid Gateway specified in their IP Address. If a Gateway of 0.0.0.0 is specified, update the Gateway on each IP7 with the IP Address of the TalkMaster FOCUS Server
- Open the TalkMaster FOCUS Firmware Management Console and connect to the same TalkMaster FOCUS Server that the IP7s are connected to
- Press the FIND ALL button located in the lower left hand corner of the screen
- Select up to ten IP7s
- Press the Update IP7 Firmware button, select the appropriate firmware file with an extension of .ip7 and press OK
- The firmware will be sent to each selected IP7. The Status will change from Starting to 100% to Unavailable
- Once the firmware has been sent to the IP7, you must wait for about 45 seconds for the new firmware to be applied. DO NOT REPOWER THE IP7 DURING THIS TIME
- Press the FIND All button
- The IP7 will automatically reboot, reconnect to the TalkMaster FOCUS Server and the updated firmware version will be displayed under the TYPE column
If the IP7 Firmware update runs successfully, but the IP7 does not display the updated version number:
Download and install the Stand Alone Firmware installer and follow the instructions in the manual to flash the IP7 using a USB cable
Try pressing the FIND ALL button
Try running the Firmware upgrade again
In rare instances on older IP7s, you may have to use a USB cable to update the IP7’s firmware
8. Audio
Audio received from IP Endpoint is noisy or too low at Operator Console
- Make sure the PC running TalkMaster FOCUS Operator Console has its volume level turned up
- Check PC’s speaker by playing a wave file from the computer
- If no audio is being received from an IP7-STx, make sure the ST-MIC switch on the IP7 is set correctly. Refer to the IP7-STx Getting Started Guide to determine the correct setting based on the analog audio device the IP&-STx is connected to
- Make sure the IP Endpoint is located at least 1 meter away from any DC Transformers or stepper motors
- Connect the IP7’s J3-7 connector (Case) to an earth ground
- Use shielded audio cable for microphone connections. Ground the shield to J2-4 (GND) on the IP7. Do not connect the shield at the Speaker/Microphone. This will “drain” noise off of the line
- Make sure the Microphone wire is not run in the same conduit as AC power
- If possible, disconnect the IP7’s Microphone to see if the noise goes away. If it does, the issue is with the Mic / Mic wiring.
- If the audio is still bad, contact Digital Acoustics Technical Support
Audio from TalkMaster Console is too low or noisy at the IP7’s Speaker
- Set the IP7’s volume level to 6 or 7. Login to TalkMaster FOCUS Operator Console using an Logon ID that has been defined with Administrator Rights, select Menu option View >> Preferences, select the Audio and Volume tab and then check the Setup Volume box. Click OK and then use the Get Volume / Set Volume buttons to view and set each IP Endpoint’s speaker volume level. The IP7’s volume can also be set by using the Vol+ and Vol- buttons on the IP7 (press Vol+ or Vol- seven times for max or minimum volume)
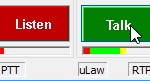
- If the volume is still too low, use TalkMaster FOCUS Operator Console to select the Intercom and press the Chime button. If the volume is OK at the IP7, the issue is most likely with the PC’s microphone. While talking to the IP7 from the Operator Console, look at the VU Meter under the Talk button. It should be moving into the yellow area.
 If the microphone level is too low or too high, adjust the PC’s Microphone (this procedure will vary based on the version of the Windows you are using)
 - If the audio is still bad, contact Digital Acoustics Technical Support
Using pre-recorded wav files from TalkMaster FOCUS
Audio Messages in TalkMaster FOCUS Server can use WAV or MP3 format, but are always converted to G.711 uLaw Wav format (8k sample rate) when played
Refer to the Application Note on creating pre-recorded audio files for use with TalkMaster FOCUS
Get Support
"*" indicates required fields